Flutter Navigation: How to Move Between Screens
Learn Flutter navigation step by step: Navigator.push and pop, passing data to a screen, returning results, pushReplacement for login flows, named routes, and when to use go_router.
By Yaqoob Developer · · 7 min read
- #Flutter
- #Navigation
- #Navigator
- #Routes
- #Beginners
Real apps have more than one screen: a product list and a product details page, a settings page, a profile page. In this guide you will learn how to move between screens in Flutter, pass data to a new screen, get a result back, and use named routes.
All examples use Flutter's built-in Navigator, so you do not need any packages.
In this post you will learn:
- How Flutter's navigation stack works
- How to open a new screen with
Navigator.push - How to go back with
Navigator.pop - How to send data to the next screen
- How to get data back from a screen
- How to replace screens (for example after login)
- How to use named routes
- When to use a package like go_router
How navigation works: the stack
In Flutter, every screen is called a route. The Navigator keeps routes in a stack, like a pile of plates:
- push puts a new screen on top of the pile. That is the screen you see.
- pop removes the top screen, and the one underneath becomes visible again.
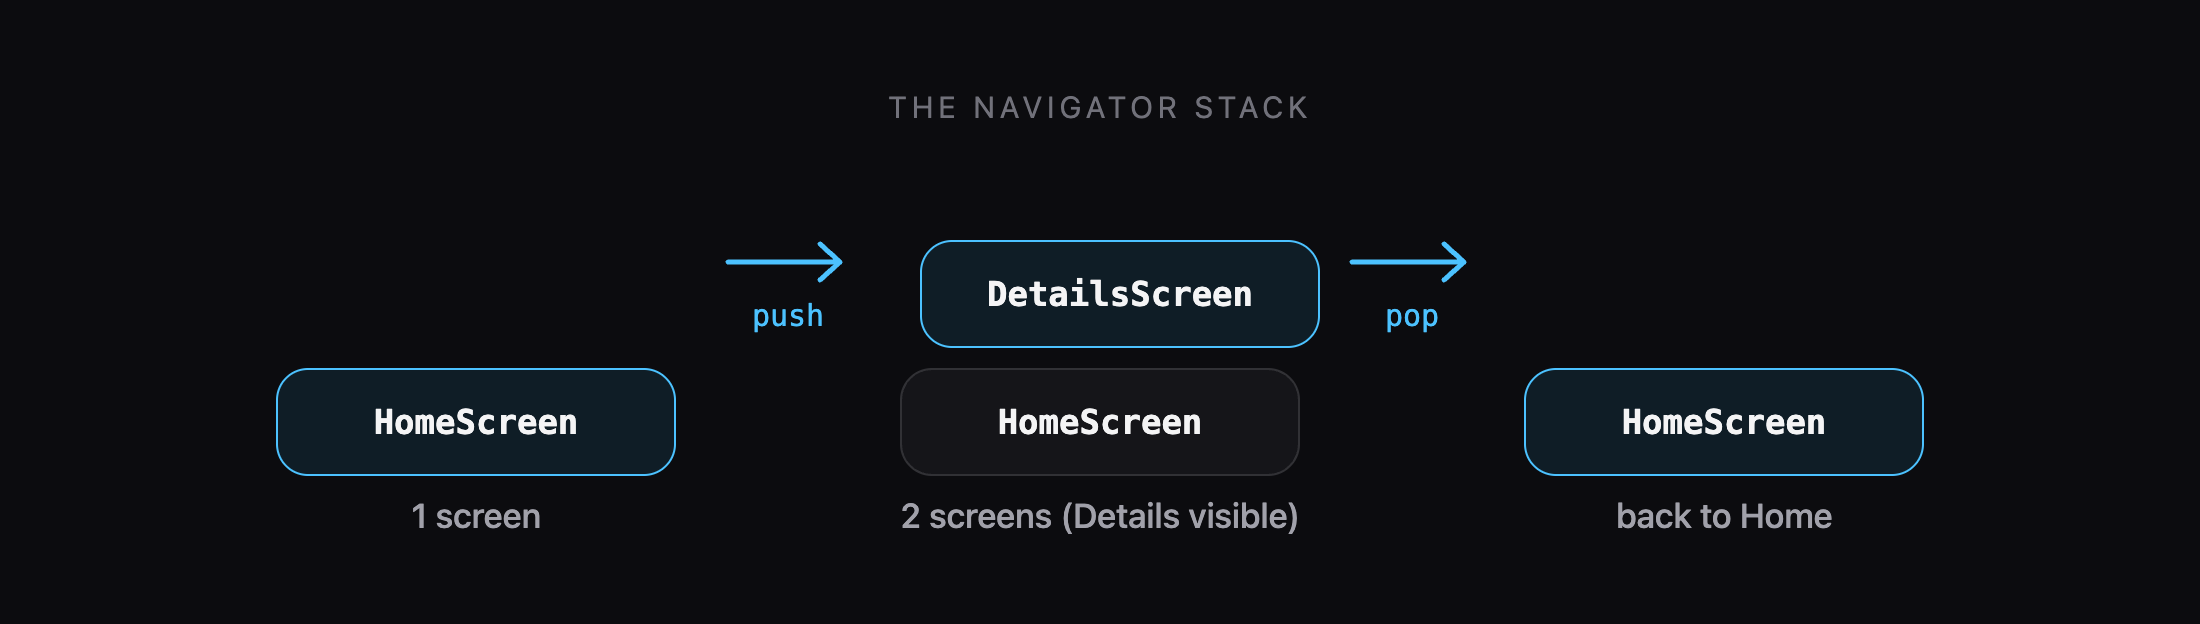
The phone's back button and the back arrow in the AppBar both call pop for you automatically.
Step 1: Create two screens
Start with a home screen and a second screen:
import 'package:flutter/material.dart';

void main() {
  runApp(const MaterialApp(
    debugShowCheckedModeBanner: false,
    home: HomeScreen(),
  ));
}

class HomeScreen extends StatelessWidget {
  const HomeScreen({super.key});

  @override
  Widget build(BuildContext context) {
    return Scaffold(
      appBar: AppBar(title: const Text('Home')),
      body: Center(
        child: FilledButton(
          onPressed: () {
            // We will add navigation here
          },
          child: const Text('Open second screen'),
        ),
      ),
    );
  }
}

class SecondScreen extends StatelessWidget {
  const SecondScreen({super.key});

  @override
  Widget build(BuildContext context) {
    return Scaffold(
      appBar: AppBar(title: const Text('Second screen')),
      body: const Center(child: Text('Hello from the second screen!')),
    );
  }
}
Step 2: Open a screen with Navigator.push
Replace the comment in onPressed with:
onPressed: () {
  Navigator.push(
    context,
    MaterialPageRoute(builder: (context) => const SecondScreen()),
  );
},
Navigator.pushadds a new route to the stack.MaterialPageRoutecreates a route with the standard animation for each platform: a slide on iOS and a fade-and-zoom on Android.builderreturns the screen widget to show.
Run the app and tap the button. The second screen slides in, and the AppBar automatically shows a back arrow.
Step 3: Go back with Navigator.pop
The back arrow already works, but you can also go back from your own button:
FilledButton(
  onPressed: () => Navigator.pop(context),
  child: const Text('Go back'),
)
Navigator.pop(context) removes the current screen from the stack.
Step 4: Send data to the next screen
The cleanest way to pass data is through the constructor of the new screen. Here is a list of products where tapping one opens its details:
class Product {
  const Product({required this.name, required this.price, required this.icon});

  final String name;
  final double price;
  final IconData icon;
}

const products = [
  Product(name: 'Headphones', price: 59.99, icon: Icons.headphones),
  Product(name: 'Smart Watch', price: 129.00, icon: Icons.watch),
  Product(name: 'Camera', price: 349.50, icon: Icons.photo_camera),
  Product(name: 'Speaker', price: 79.00, icon: Icons.speaker),
];

class ProductListScreen extends StatelessWidget {
  const ProductListScreen({super.key});

  @override
  Widget build(BuildContext context) {
    return Scaffold(
      appBar: AppBar(title: const Text('Products')),
      body: ListView.builder(
        itemCount: products.length,
        itemBuilder: (context, index) {
          final product = products[index];
          return ListTile(
            leading: Icon(product.icon),
            title: Text(product.name),
            subtitle: Text('\$${product.price.toStringAsFixed(2)}'),
            trailing: const Icon(Icons.chevron_right),
            onTap: () {
              Navigator.push(
                context,
                MaterialPageRoute(
                  builder: (context) => ProductDetailScreen(product: product),
                ),
              );
            },
          );
        },
      ),
    );
  }
}

class ProductDetailScreen extends StatelessWidget {
  const ProductDetailScreen({super.key, required this.product});

  final Product product;

  @override
  Widget build(BuildContext context) {
    return Scaffold(
      appBar: AppBar(title: Text(product.name)),
      body: Padding(
        padding: const EdgeInsets.all(24),
        child: Column(
          crossAxisAlignment: CrossAxisAlignment.stretch,
          children: [
            Icon(product.icon, size: 120),
            const SizedBox(height: 24),
            Text(
              product.name,
              style: Theme.of(context).textTheme.headlineMedium,
            ),
            const SizedBox(height: 8),
            Text(
              '\$${product.price.toStringAsFixed(2)}',
              style: Theme.of(context).textTheme.titleLarge,
            ),
          ],
        ),
      ),
    );
  }
}
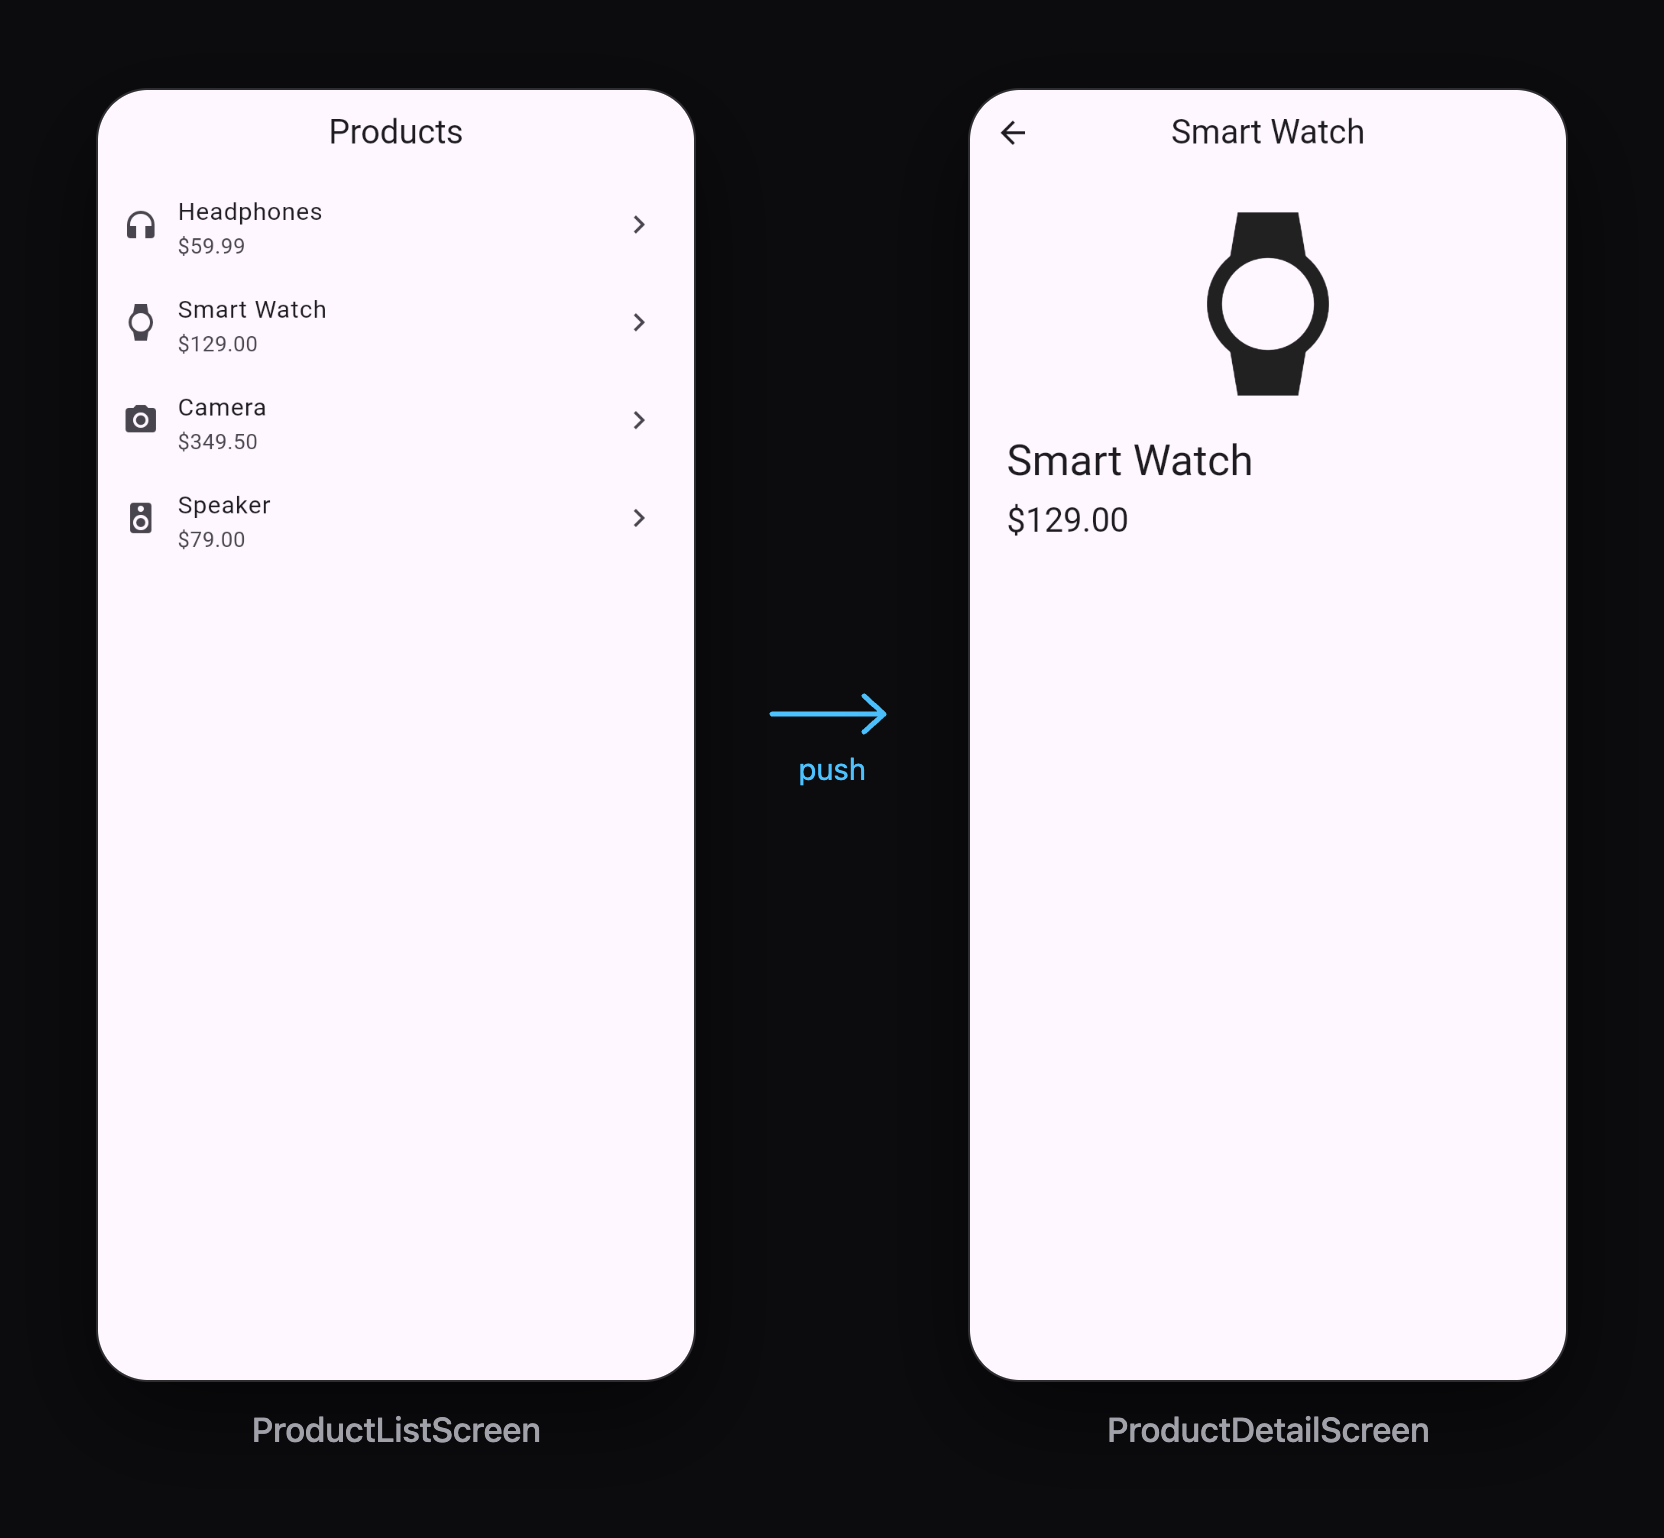
ProductDetailScreen asks for a required this.product in its constructor, so it is impossible to open it without passing a product. The compiler protects you from forgetting.
Step 5: Get data back from a screen
Sometimes the second screen needs to return something: a selected color, an edited name, or "yes / no" from a confirmation page.
Navigator.pushreturns aFuture. Await it to get the result.- On the second screen, pass the result as the second argument to
Navigator.pop.
class ColorPickerScreen extends StatelessWidget {
  const ColorPickerScreen({super.key});

  @override
  Widget build(BuildContext context) {
    final colors = {
      'Red': Colors.red,
      'Green': Colors.green,
      'Blue': Colors.blue,
    };

    return Scaffold(
      appBar: AppBar(title: const Text('Pick a color')),
      body: ListView(
        children: [
          for (final entry in colors.entries)
            ListTile(
              leading: CircleAvatar(backgroundColor: entry.value),
              title: Text(entry.key),
              // Send the chosen name back to the previous screen
              onTap: () => Navigator.pop(context, entry.key),
            ),
        ],
      ),
    );
  }
}
And on the first screen:
class ProfileScreen extends StatefulWidget {
  const ProfileScreen({super.key});

  @override
  State<ProfileScreen> createState() => _ProfileScreenState();
}

class _ProfileScreenState extends State<ProfileScreen> {
  String _favoriteColor = 'None';

  Future<void> _pickColor() async {
    final result = await Navigator.push<String>(
      context,
      MaterialPageRoute(builder: (context) => const ColorPickerScreen()),
    );

    // result is null if the user pressed back without choosing
    if (result != null) {
      setState(() => _favoriteColor = result);
    }
  }

  @override
  Widget build(BuildContext context) {
    return Scaffold(
      appBar: AppBar(title: const Text('Profile')),
      body: Center(
        child: Column(
          mainAxisSize: MainAxisSize.min,
          children: [
            Text('Favorite color: $_favoriteColor'),
            const SizedBox(height: 16),
            FilledButton(onPressed: _pickColor, child: const Text('Choose color')),
          ],
        ),
      ),
    );
  }
}
Important details:
Navigator.push<String>tells Dart the result will be aString.- The result is null if the user leaves with the back button instead of picking something. Always check for null.
Step 6: Replace screens
Sometimes the user should not be able to go back. After logging in, pressing back should not return to the login screen.
pushReplacement
Replaces the current screen with a new one:
Navigator.pushReplacement(
  context,
  MaterialPageRoute(builder: (context) => const HomeScreen()),
);
Use it for: login → home, splash screen → home, onboarding → home.
pushAndRemoveUntil
Opens a new screen and removes every screen below it:
Navigator.pushAndRemoveUntil(
  context,
  MaterialPageRoute(builder: (context) => const LoginScreen()),
  (route) => false, // false = remove all previous routes
);
Use it for logout: the user lands on the login screen with an empty history.
popUntil
Goes back several screens at once, for example to the very first screen:
Navigator.popUntil(context, (route) => route.isFirst);
Step 7: Named routes
In bigger apps, you can give each screen a name and register all of them in one place:
void main() {
  runApp(MaterialApp(
    initialRoute: '/',
    routes: {
      '/': (context) => const HomeScreen(),
      '/settings': (context) => const SettingsScreen(),
      '/about': (context) => const AboutScreen(),
    },
  ));
}
Then navigate with just the name:
Navigator.pushNamed(context, '/settings');
To pass data with a named route, use arguments:
Navigator.pushNamed(context, '/details', arguments: product);
And read it on the new screen:
final product = ModalRoute.of(context)!.settings.arguments as Product;
When you use routes, do not also set home. The '/' route is the home screen.
Named routes keep all screen names in one place, but arguments are not type-checked. If you pass the wrong type, the app crashes at runtime. For small and medium apps, passing data through constructors (Step 4) is safer and simpler.
Which method should I use?
| Situation | Use |
|---|---|
| Open a screen | Navigator.push |
| Go back | Navigator.pop(context) |
| Send data forward | constructor parameter |
| Get data back | await Navigator.push + Navigator.pop(context, result) |
| Login → home, splash → home | Navigator.pushReplacement |
| Logout | Navigator.pushAndRemoveUntil(..., (route) => false) |
| Back to the first screen | Navigator.popUntil(context, (route) => route.isFirst) |
| Many screens, one central list | named routes |
| Web URLs, deep links, large apps | the go_router package |
What about go_router?
go_router is an official Flutter package for URL-based navigation. It is worth learning when your app runs on the web (so each screen has a real URL), needs deep links (opening a specific screen from a link or notification), or has many nested screens. For learning and for most beginner apps, Navigator is all you need.
Common mistakes
"Navigator operation requested with a context that does not include a Navigator"
You used the context of the widget that creates MaterialApp. That context sits above the Navigator. Move your screen into its own widget (like HomeScreen above) and use the context inside its build method.
Using context after await
After await Navigator.push(...), the screen might have been closed. Check if (!mounted) return; (in a State class) or if (!context.mounted) return; before using context again.
The back button returns to the login screen
You used push after login. Use pushReplacement or pushAndRemoveUntil instead.
"type 'Null' is not a subtype of type 'Product'"
You opened a named route without passing arguments, but the screen expects them. Always pass arguments, or use constructor parameters instead of named routes.
What to learn next
- Flutter ListView and GridView: Complete Beginner Guide to build the lists you navigate from
- Flutter setState vs Provider: State Management for Beginners to share data between screens without passing it everywhere
- Flutter Firebase Authentication: Login and Sign Up, which shows a different approach: switching screens automatically when the user logs in
Keep reading
More articles
· 9 min read
Dart Basics for Flutter Beginners: Variables, Functions and Classes
Learn the Dart you need for Flutter: variables, final and const, null safety, lists and maps, if and loops, functions with named parameters, classes, and async/await, with runnable examples.
· 9 min read
Flutter Row, Column and Stack Explained with Examples
Understand Flutter's core layout widgets: main and cross axis, mainAxisAlignment, crossAxisAlignment, Expanded, Flexible, Spacer, Stack and Positioned, plus a complete profile card example.
· 7 min read
Flutter ListView and GridView: Complete Beginner Guide
Build scrolling lists and grids in Flutter: ListView, ListView.builder, ListView.separated, horizontal lists, GridView.builder, childAspectRatio, and a complete responsive product grid.