Your First Flutter App: Step-by-Step Tutorial for Beginners
Build your first Flutter app from scratch: create a project, understand main.dart and widgets, learn StatelessWidget vs StatefulWidget, and make a working To-Do list app with hot reload.
By Yaqoob Developer · · 9 min read
- #Flutter
- #Beginners
- #Dart
- #Widgets
- #Tutorial
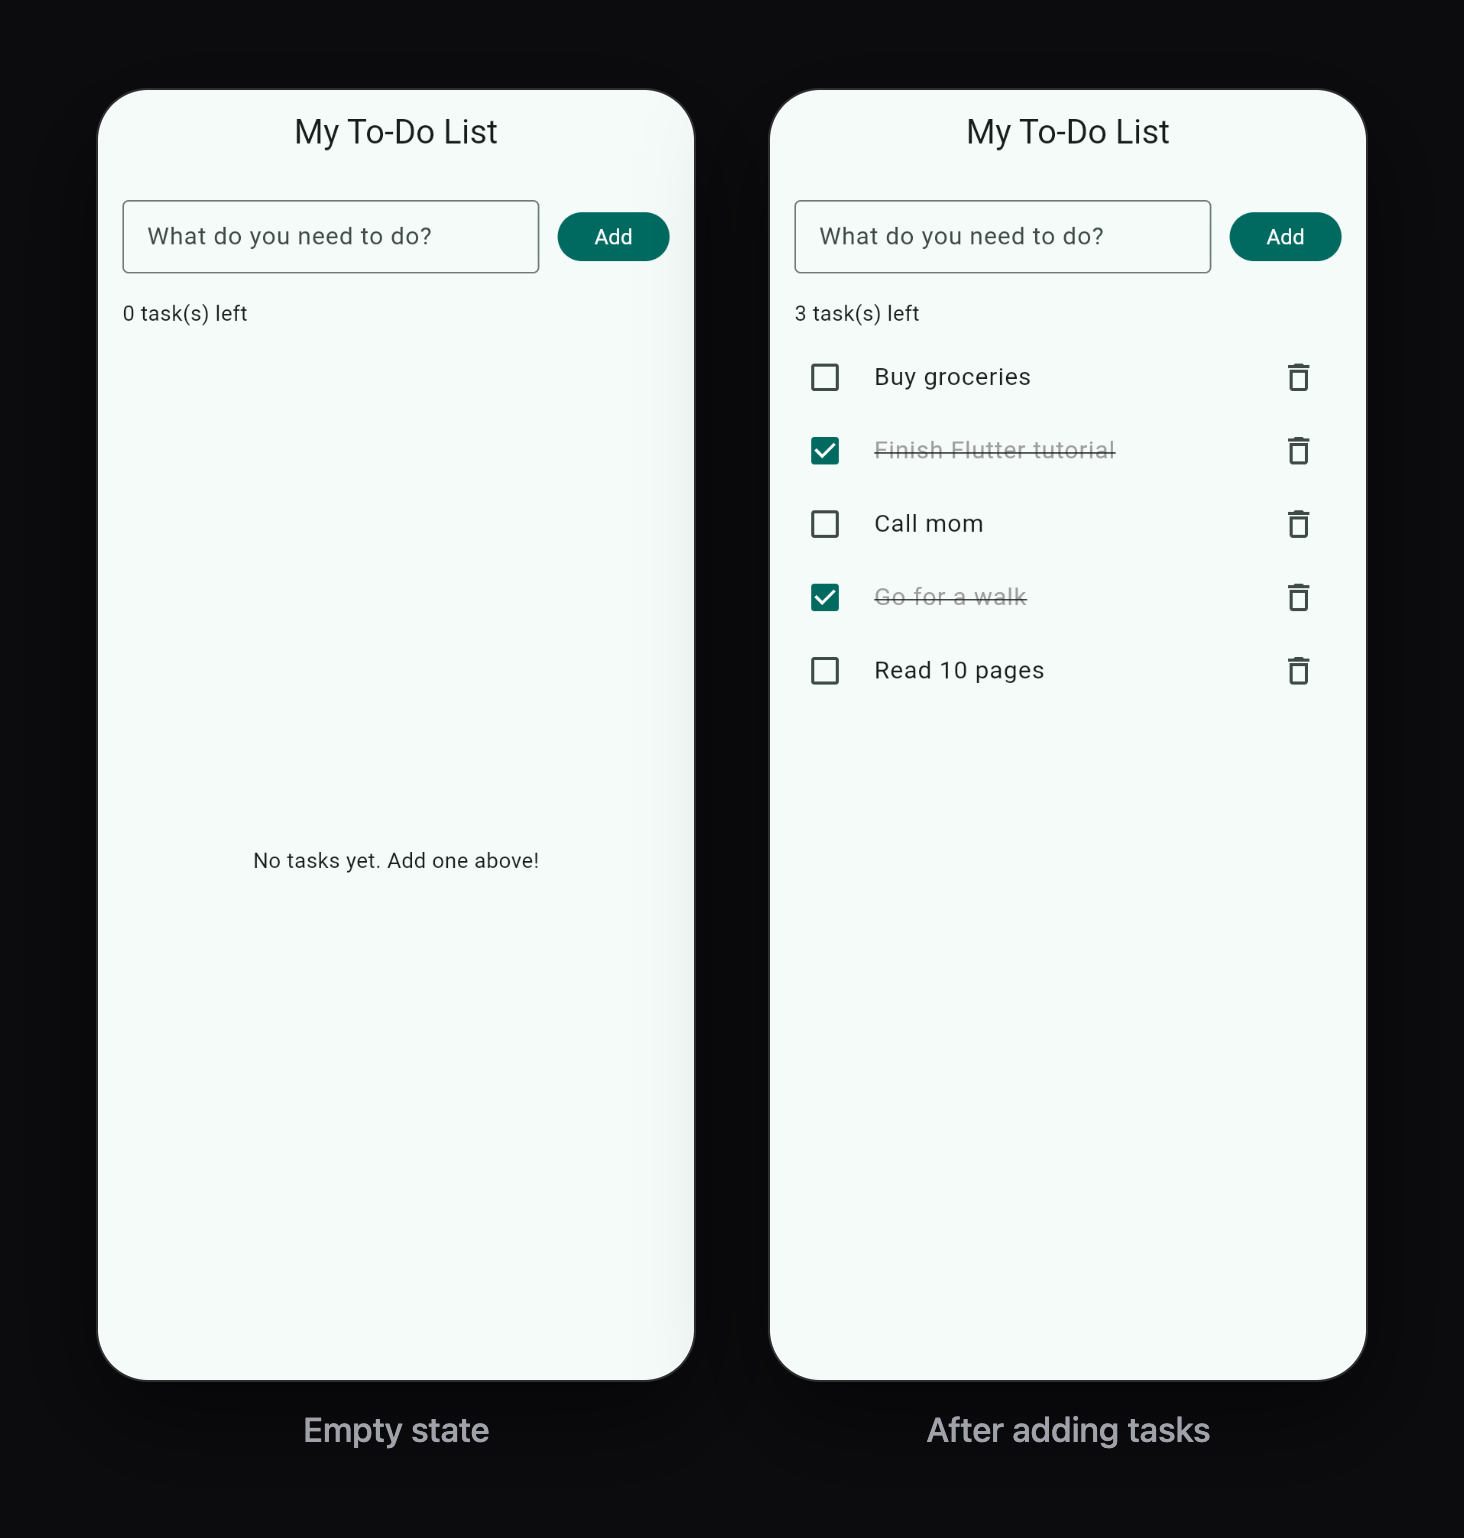
In this tutorial you will create your first real Flutter app from scratch: a simple To-Do List where you can add tasks, tick them off and delete them. Along the way you will learn the ideas every Flutter developer uses daily: widgets, layouts, state and hot reload.
No previous Flutter experience is needed. If you can follow steps and copy code, you can finish this tutorial in about 45 minutes.
In this post you will learn:
- How to create and run a new Flutter project
- What every file in a new project is for
- How
main.dartworks, line by line - The difference between StatelessWidget and StatefulWidget
- How to build a To-Do app with TextField, ListView and Checkbox
- How to use hot reload to see changes instantly
- Common beginner errors and how to fix them
Before you start
You need Flutter installed and working. Open a terminal and run:
flutter doctor
If you see green check marks for Flutter and at least one device platform (Android, iOS, Chrome or desktop), you are ready. If not, follow my Flutter installation guide for Windows and macOS first.
You also need a code editor. This tutorial uses VS Code with the Flutter extension, but Android Studio works the same way.
Step 1: Create a new Flutter project
Open a terminal in the folder where you keep your projects and run:
flutter create todo_app
cd todo_app
Project names must be lowercase with underscores (todo_app, not TodoApp or todo-app). Flutter uses this name as a Dart package name, which has strict rules.
Now open the folder in VS Code:
code .
You can also create a project from VS Code: press Ctrl + Shift + P (Cmd + Shift + P on Mac), type Flutter: New Project, choose Application, pick a folder and enter the name.
Step 2: Understand the project files
A new Flutter project has many folders, but as a beginner you only need a few:
todo_app/
├── android/         # Android-specific code (you rarely touch this)
├── ios/             # iOS-specific code (you rarely touch this)
├── web/             # web support files
├── lib/
│   └── main.dart    # YOUR CODE LIVES HERE
├── test/            # automated tests
└── pubspec.yaml     # app name, version, packages, assets
lib/is where all your Dart code goes. Almost all your work happens here.pubspec.yamlis the settings file of your app. You add packages, images and fonts here.android/andios/contain the native projects that Flutter builds for each platform. You only edit them for things like app icons, permissions or package names.
Step 3: Run the starter app
Before writing any code, make sure the default app runs.
- Choose a device. In VS Code, click the device name in the bottom-right status bar and pick an Android emulator, an iOS simulator (Mac only), Chrome, or your desktop.
- Press F5, or run this in the terminal:
flutter run
The first build can take a few minutes, especially on Android. When it finishes, you see the Flutter demo counter app. Tap the + button and the number goes up.
Congratulations, you just ran a Flutter app. Now let's replace it with our own.
Step 4: Understand main.dart
Open lib/main.dart. The starter code is long, so let's look at the smallest possible Flutter app first:
import 'package:flutter/material.dart';

void main() {
  runApp(const MyApp());
}

class MyApp extends StatelessWidget {
  const MyApp({super.key});

  @override
  Widget build(BuildContext context) {
    return const MaterialApp(
      home: Scaffold(
        body: Center(
          child: Text('Hello, Flutter!'),
        ),
      ),
    );
  }
}
Line by line:
import 'package:flutter/material.dart';loads Flutter's Material Design widgets: buttons, text fields, app bars and more.main()is where every Dart program starts.runApp()takes a widget and makes it the root of your app.MyAppis our own widget. It extendsStatelessWidget, which means it never changes by itself.build()returns what the widget looks like. Flutter calls it whenever it needs to draw the widget.MaterialAppsets up the app: theme, navigation and the first screen (home).Scaffoldis a basic screen layout with places for an app bar, body and floating button.Centercenters its child, andTextshows a string.
Everything is a widget
This is the most important idea in Flutter. A screen is a tree of widgets inside widgets:
MaterialApp
└── Scaffold
    └── Center
        └── Text
Padding is a widget. Centering is a widget. Even the whole app is a widget. Once this clicks, Flutter becomes much easier to read.
Step 5: StatelessWidget vs StatefulWidget
Flutter has two main kinds of widgets:
| StatelessWidget | StatefulWidget | |
|---|---|---|
| Changes over time? | No | Yes |
Has setState()? | No | Yes |
| Example | A title, an icon, a static card | A counter, a form, a to-do list |
A StatefulWidget keeps data (its state) in a separate State class. When you change that data inside setState(), Flutter calls build() again and redraws the screen with the new data.
setState(() {
  count = count + 1; // change the data...
});                  // ...and Flutter redraws the widget
Our To-Do list changes when you add or remove tasks, so it will be a StatefulWidget.
Step 6: Build the To-Do app
Delete everything in lib/main.dart and replace it with this code:
import 'package:flutter/material.dart';

void main() {
  runApp(const TodoApp());
}

class TodoApp extends StatelessWidget {
  const TodoApp({super.key});

  @override
  Widget build(BuildContext context) {
    return MaterialApp(
      title: 'To-Do List',
      debugShowCheckedModeBanner: false,
      theme: ThemeData(
        colorSchemeSeed: Colors.teal,
        useMaterial3: true,
      ),
      home: const TodoScreen(),
    );
  }
}

/// One task in the list.
class Task {
  Task(this.title);

  final String title;
  bool done = false;
}

class TodoScreen extends StatefulWidget {
  const TodoScreen({super.key});

  @override
  State<TodoScreen> createState() => _TodoScreenState();
}

class _TodoScreenState extends State<TodoScreen> {
  final List<Task> _tasks = [];
  final TextEditingController _controller = TextEditingController();

  @override
  void dispose() {
    _controller.dispose();
    super.dispose();
  }

  void _addTask() {
    final text = _controller.text.trim();
    if (text.isEmpty) return;

    setState(() {
      _tasks.add(Task(text));
    });
    _controller.clear();
  }

  void _toggleTask(Task task) {
    setState(() {
      task.done = !task.done;
    });
  }

  void _deleteTask(Task task) {
    setState(() {
      _tasks.remove(task);
    });
  }

  @override
  Widget build(BuildContext context) {
    final remaining = _tasks.where((t) => !t.done).length;

    return Scaffold(
      appBar: AppBar(
        title: const Text('My To-Do List'),
        centerTitle: true,
      ),
      body: Column(
        children: [
          Padding(
            padding: const EdgeInsets.all(16),
            child: Row(
              children: [
                Expanded(
                  child: TextField(
                    controller: _controller,
                    textInputAction: TextInputAction.done,
                    onSubmitted: (_) => _addTask(),
                    decoration: const InputDecoration(
                      hintText: 'What do you need to do?',
                      border: OutlineInputBorder(),
                    ),
                  ),
                ),
                const SizedBox(width: 12),
                FilledButton(
                  onPressed: _addTask,
                  child: const Text('Add'),
                ),
              ],
            ),
          ),
          Padding(
            padding: const EdgeInsets.symmetric(horizontal: 16),
            child: Align(
              alignment: Alignment.centerLeft,
              child: Text('$remaining task(s) left'),
            ),
          ),
          const SizedBox(height: 8),
          Expanded(
            child: _tasks.isEmpty
                ? const Center(child: Text('No tasks yet. Add one above!'))
                : ListView.builder(
                    itemCount: _tasks.length,
                    itemBuilder: (context, index) {
                      final task = _tasks[index];
                      return ListTile(
                        leading: Checkbox(
                          value: task.done,
                          onChanged: (_) => _toggleTask(task),
                        ),
                        title: Text(
                          task.title,
                          style: TextStyle(
                            decoration:
                                task.done ? TextDecoration.lineThrough : null,
                            color: task.done ? Colors.grey : null,
                          ),
                        ),
                        trailing: IconButton(
                          icon: const Icon(Icons.delete_outline),
                          onPressed: () => _deleteTask(task),
                        ),
                        onTap: () => _toggleTask(task),
                      );
                    },
                  ),
          ),
        ],
      ),
    );
  }
}
Save the file. If the app is still running, it updates instantly. If not, run flutter run again.
Type a task, press Add (or Enter), and it appears in the list. Tap a task to tick it off, and tap the bin icon to delete it.
Step 7: How the To-Do app works
Let's break the code into small pieces.
The Task class
class Task {
  Task(this.title);

  final String title;
  bool done = false;
}
This is plain Dart, not a widget. It describes one task: a title that never changes, and a done flag that can change.
The state
final List<Task> _tasks = [];
final TextEditingController _controller = TextEditingController();
_tasksholds every task. The underscore_makes it private to this file._controllerlets us read and clear the text inside theTextField.- We call
_controller.dispose()indispose()to free memory when the screen is closed. Always dispose controllers you create.
Adding a task
void _addTask() {
  final text = _controller.text.trim();
  if (text.isEmpty) return;

  setState(() {
    _tasks.add(Task(text));
  });
  _controller.clear();
}
We read the text, ignore empty input, add a new Task inside setState so Flutter redraws the list, then clear the text field.
If you add to the list without setState, the data changes but the screen does not. This is the most common beginner bug.
The layout
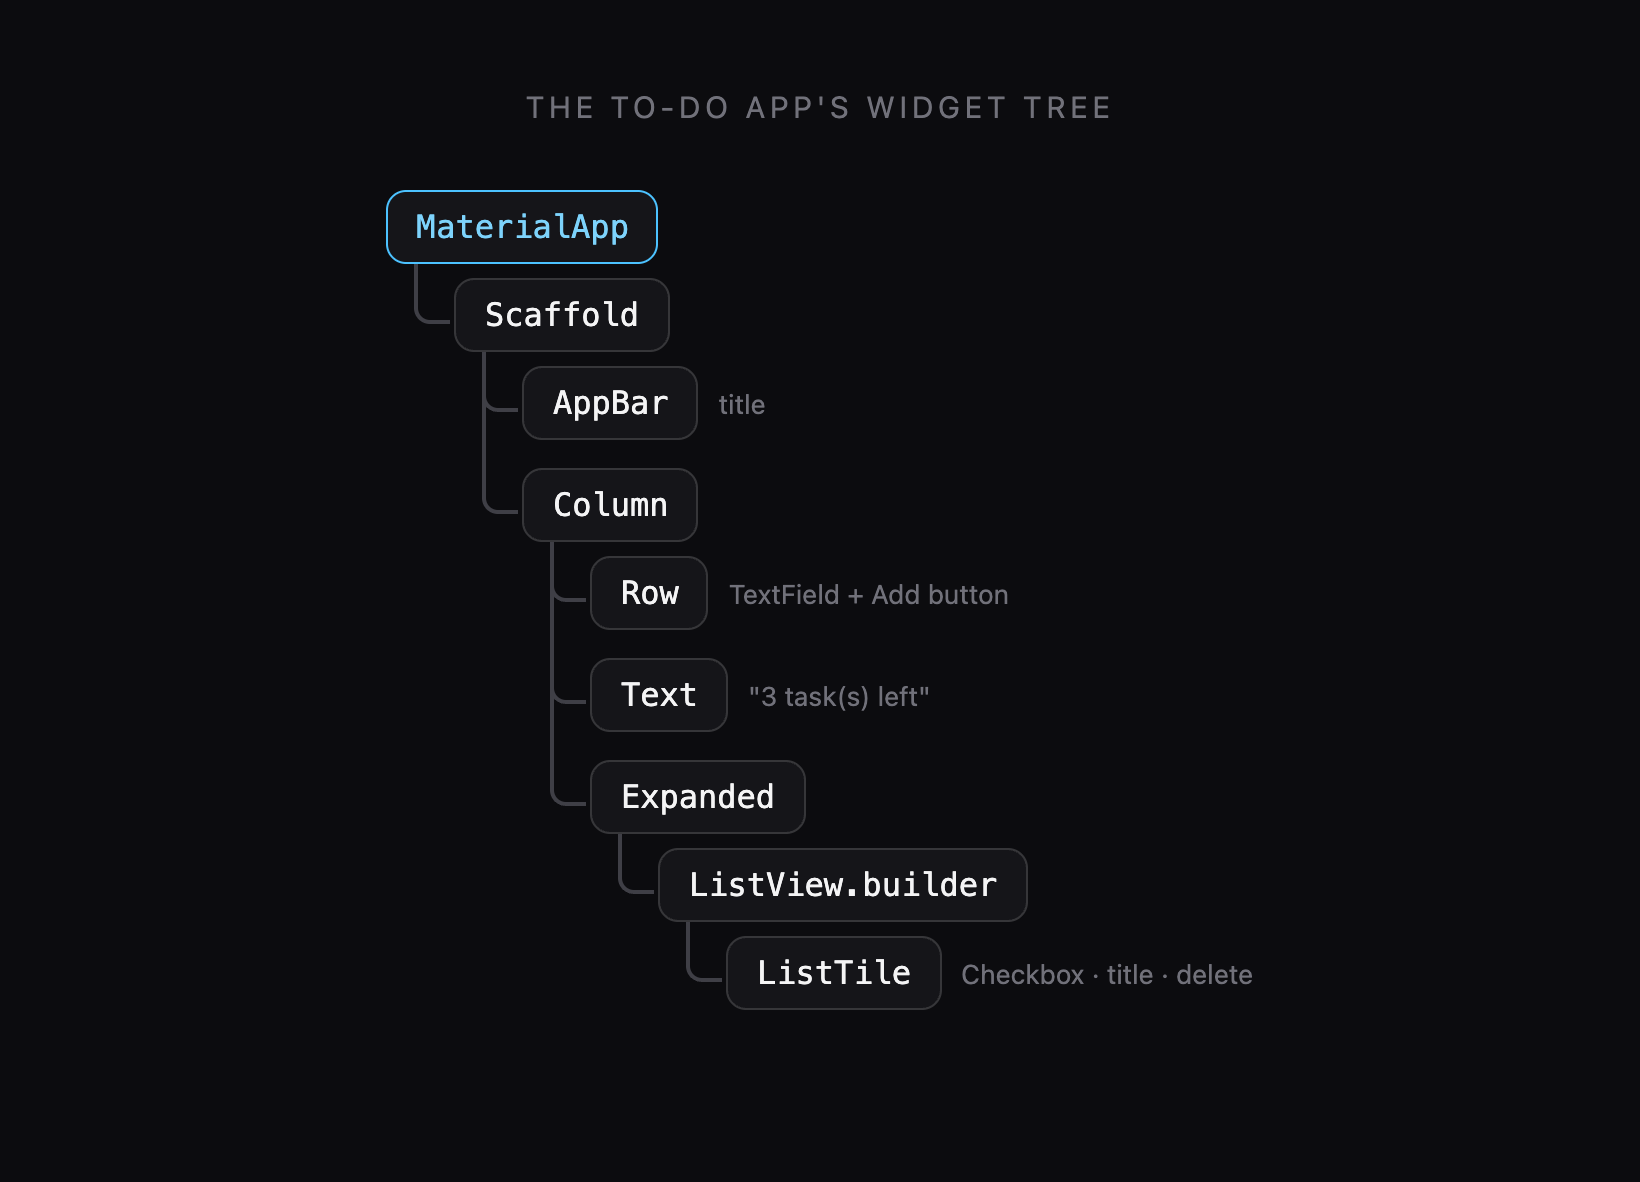
Scaffold
├── AppBar                 → title bar
└── Column                 → stacks children vertically
    ├── Row                → TextField + Add button side by side
    ├── Text               → "2 task(s) left"
    └── Expanded           → fills the remaining space
        └── ListView.builder → the scrollable task list
Columnplaces widgets top to bottom;Rowplaces them left to right.Expandedtells a child to take all remaining space. TheTextFieldis insideExpandedso it fills the row next to the button, and theListViewis insideExpandedso it fills the rest of the screen.ListView.builderonly builds the rows visible on screen, so it stays fast even with thousands of items.ListTileis a ready-made row withleading,titleandtrailingslots, perfect for lists.
Step 8: Try hot reload
Hot reload is Flutter's superpower. With the app running, change the theme color in TodoApp:
colorSchemeSeed: Colors.deepPurple,
Save the file (or press r in the terminal where flutter run is running). The colors change in under a second, and your tasks are still there, because hot reload keeps the app's state.
- Hot reload (
r): updates the UI and keeps state. Use it for most changes. - Hot restart (
R): restarts the app from scratch and clears state. Use it when you changemain()or initial values of fields. - Full restart (stop and
flutter run): needed after adding new packages or changing native files.
Small challenges to practice
Try these on your own to lock in what you learned:
- Change the empty-state text to something friendlier and add an icon above it.
- Show a
SnackBarwhen a task is deleted:ScaffoldMessenger.of(context).showSnackBar(...). - Add a "Clear completed" button in the
AppBaractionsthat removes all done tasks. - Swipe to delete: wrap each
ListTilein aDismissiblewidget.
Common beginner errors and how to fix them
The screen does not update when I add a task
You changed the list outside setState(). Wrap every change to your data in setState(() { ... }).
"A RenderFlex overflowed by X pixels"
Content is too big for its Row or Column, and Flutter shows yellow and black stripes. Wrap the large child in Expanded, or make the screen scrollable with SingleChildScrollView or ListView.
"Vertical viewport was given unbounded height"
You put a ListView directly inside a Column. A ListView wants infinite height and a Column gives it none. Wrap the ListView in Expanded, exactly as in Step 6.
Red squiggly lines saying "Prefer const with constant constructors"
That is only a lint hint, not an error. Adding const in front of widgets that never change makes your app slightly faster. VS Code can fix them all: open the Quick Fix menu (Ctrl + .) and choose Add 'const' modifier.
"No connected devices"
Start an emulator first (Android Studio → Device Manager → ▶), or select Chrome or your desktop as the device. Run flutter devices to see what Flutter can find.
What to learn next
You built and understood a complete Flutter app. Good next steps:
- Design better screens: follow How to Create a Beautiful Login Screen in Flutter.
- Load real data from the internet: follow How to Fetch API Data in Flutter Using HTTP.
- Save data online: connect your app to Firebase.
- Organize bigger apps: read my guide on Flutter Clean Architecture and folder structure.
You can also browse my Flutter UI projects for complete screens with source code and build videos.
Keep reading
More articles
· 9 min read
Dart Basics for Flutter Beginners: Variables, Functions and Classes
Learn the Dart you need for Flutter: variables, final and const, null safety, lists and maps, if and loops, functions with named parameters, classes, and async/await, with runnable examples.
· 9 min read
Flutter Row, Column and Stack Explained with Examples
Understand Flutter's core layout widgets: main and cross axis, mainAxisAlignment, crossAxisAlignment, Expanded, Flexible, Spacer, Stack and Positioned, plus a complete profile card example.
· 7 min read
Flutter Navigation: How to Move Between Screens
Learn Flutter navigation step by step: Navigator.push and pop, passing data to a screen, returning results, pushReplacement for login flows, named routes, and when to use go_router.