How to Fetch API Data in Flutter Using HTTP (Beginner Guide)
Learn to fetch data from a REST API in Flutter with the http package: JSON to Dart model classes, FutureBuilder, loading and error states, pull-to-refresh, POST requests and common fixes.
By Yaqoob Developer · · 9 min read
- #Flutter
- #API
- #HTTP
- #JSON
- #REST
- #Beginners
Most real apps load data from the internet: weather, news, products, chat messages. In this beginner guide you will learn how to fetch data from a REST API in Flutter using the official http package, turn the JSON into Dart objects, and show it in a list with loading, error and pull-to-refresh states.
We will use the free JSONPlaceholder test API, so you do not need an account or API key.
In this post you will learn:
- What an API and JSON are, in simple words
- How to add the
httppackage and internet permissions - How to make a GET request with
http.get - How to convert JSON into a Dart model class
- How to show data with
FutureBuilder - How to handle loading, errors and empty data
- How to add pull-to-refresh and a details screen
- Common mistakes and how to fix them
Before you start
You need Flutter installed and a project that runs. If you are new to Flutter, first build your first Flutter app.
Create a new project for this tutorial:
flutter create api_demo
cd api_demo
What is an API and what is JSON?
An API is a web address that returns data instead of a web page. Your app sends a request to that address and receives a response.
Open this link in your browser: https://jsonplaceholder.typicode.com/posts/1. You will see:
{
  "userId": 1,
  "id": 1,
  "title": "sunt aut facere repellat provident occaecati...",
  "body": "quia et suscipit\nsuscipit recusandae consequuntur..."
}
That format is JSON: keys in quotes, followed by values. A list of items looks like [ {...}, {...} ]. In this tutorial we will load the full list from https://jsonplaceholder.typicode.com/posts, which returns 100 posts.
The flow in our app:
App → http.get(url) → API server → JSON text → jsonDecode → Post objects → ListView

Step 1: Add the http package
From your project folder, run:
flutter pub add http
This adds http to your pubspec.yaml. It is the official Dart package for making network requests and is perfect for beginners.
Step 2: Add internet permissions
Android
Debug builds can use the internet automatically, but release builds cannot unless you ask for permission. Many beginners only find out when their published app shows no data.
Open android/app/src/main/AndroidManifest.xml and add this line above the <application> tag:
<manifest xmlns:android="http://schemas.android.com/apk/res/android">
    <uses-permission android:name="android.permission.INTERNET" />

    <application
        ...
macOS desktop
If you run on macOS desktop, open both macos/Runner/DebugProfile.entitlements and macos/Runner/Release.entitlements and add:
<key>com.apple.security.network.client</key>
<true/>
iOS, web and Windows need no changes for HTTPS requests.
Step 3: Create the model class
A model class describes one item from the API in Dart. It turns a JSON map into a real object, so you write post.title instead of json['title'] everywhere, and the compiler can catch typos.
Create lib/models/post.dart:
class Post {
  const Post({
    required this.id,
    required this.userId,
    required this.title,
    required this.body,
  });

  final int id;
  final int userId;
  final String title;
  final String body;

  /// Creates a Post from one JSON object returned by the API.
  factory Post.fromJson(Map<String, dynamic> json) {
    return Post(
      id: json['id'] as int,
      userId: json['userId'] as int,
      title: json['title'] as String,
      body: json['body'] as String,
    );
  }
}
- The
factory Post.fromJsonconstructor reads each key from the JSON map and casts it to the right type. - The keys (
'id','userId','title','body') must match the API exactly, including upper and lower case.
Step 4: Create the API service
Keep all network code in one place, not inside your widgets. Create lib/services/post_service.dart:
import 'dart:convert';

import 'package:http/http.dart' as http;

import '../models/post.dart';

class PostService {
  static const _baseUrl = 'https://jsonplaceholder.typicode.com';

  Future<List<Post>> fetchPosts() async {
    final uri = Uri.parse('$_baseUrl/posts');

    final response = await http
        .get(uri, headers: {'Accept': 'application/json'})
        .timeout(const Duration(seconds: 10));

    if (response.statusCode != 200) {
      throw Exception('Server error: ${response.statusCode}');
    }

    final List<dynamic> data = jsonDecode(response.body);
    return data
        .map((item) => Post.fromJson(item as Map<String, dynamic>))
        .toList();
  }
}
Line by line:
import 'package:http/http.dart' as http;loads the package with the prefixhttp, so calls read clearly ashttp.get(...).Uri.parse(...)turns the address string into aUri, whichhttp.getrequires.await http.get(uri)sends the request and waits for the response without freezing the app..timeout(...)stops waiting after 10 seconds, so a bad connection does not leave users staring at a spinner forever.response.statusCodetells you whether it worked.200means OK.404means not found.500means a server error.jsonDecode(response.body)turns the JSON text into Dart lists and maps. It comes fromdart:convert, which is built in..map(...).toList()converts every JSON map into aPostobject.
Step 5: Show the data with FutureBuilder
FutureBuilder is a widget that rebuilds itself when a Future finishes. It gives you a snapshot with three possible situations: still loading, finished with an error, or finished with data.
Create lib/screens/posts_screen.dart:
import 'package:flutter/material.dart';

import '../models/post.dart';
import '../services/post_service.dart';
import 'post_detail_screen.dart';

class PostsScreen extends StatefulWidget {
  const PostsScreen({super.key});

  @override
  State<PostsScreen> createState() => _PostsScreenState();
}

class _PostsScreenState extends State<PostsScreen> {
  final _service = PostService();
  late Future<List<Post>> _postsFuture;

  @override
  void initState() {
    super.initState();
    _postsFuture = _service.fetchPosts();
  }

  Future<void> _refresh() async {
    final future = _service.fetchPosts();
    setState(() => _postsFuture = future);
    try {
      await future;
    } catch (_) {
      // The error is shown by the FutureBuilder below.
    }
  }

  @override
  Widget build(BuildContext context) {
    return Scaffold(
      appBar: AppBar(title: const Text('Posts')),
      body: FutureBuilder<List<Post>>(
        future: _postsFuture,
        builder: (context, snapshot) {
          // 1. Still loading
          if (snapshot.connectionState == ConnectionState.waiting) {
            return const Center(child: CircularProgressIndicator());
          }

          // 2. Something went wrong
          if (snapshot.hasError) {
            return Center(
              child: Padding(
                padding: const EdgeInsets.all(24),
                child: Column(
                  mainAxisSize: MainAxisSize.min,
                  children: [
                    const Icon(Icons.wifi_off, size: 48),
                    const SizedBox(height: 12),
                    const Text(
                      'Could not load posts.\nCheck your internet connection.',
                      textAlign: TextAlign.center,
                    ),
                    const SizedBox(height: 16),
                    FilledButton(
                      onPressed: _refresh,
                      child: const Text('Try again'),
                    ),
                  ],
                ),
              ),
            );
          }

          // 3. Data arrived
          final posts = snapshot.data ?? [];
          if (posts.isEmpty) {
            return const Center(child: Text('No posts found.'));
          }

          return RefreshIndicator(
            onRefresh: _refresh,
            child: ListView.separated(
              itemCount: posts.length,
              separatorBuilder: (_, _) => const Divider(height: 1),
              itemBuilder: (context, index) {
                final post = posts[index];
                return ListTile(
                  leading: CircleAvatar(child: Text('${post.id}')),
                  title: Text(
                    post.title,
                    maxLines: 1,
                    overflow: TextOverflow.ellipsis,
                  ),
                  subtitle: Text(
                    post.body,
                    maxLines: 2,
                    overflow: TextOverflow.ellipsis,
                  ),
                  onTap: () => Navigator.of(context).push(
                    MaterialPageRoute(
                      builder: (_) => PostDetailScreen(post: post),
                    ),
                  ),
                );
              },
            ),
          );
        },
      ),
    );
  }
}
Why the Future is created in initState
This is the most important rule of FutureBuilder: create the Future once, in initState, and store it in a variable.
// ❌ Wrong: a new request is sent every time the widget rebuilds
FutureBuilder(future: _service.fetchPosts(), ...)

// ✅ Right: the request is sent once and the result is reused
FutureBuilder(future: _postsFuture, ...)
If you call fetchPosts() directly inside build, every rebuild (rotating the phone, opening the keyboard, any setState) sends a brand-new request and shows the spinner again.
How pull-to-refresh works
RefreshIndicator shows the spinning circle when the user pulls the list down and calls _refresh. That function creates a new Future, stores it with setState so FutureBuilder listens to the new request, and waits until it finishes so the spinner hides at the right time.
Step 6: The details screen
Create lib/screens/post_detail_screen.dart:
import 'package:flutter/material.dart';

import '../models/post.dart';

class PostDetailScreen extends StatelessWidget {
  const PostDetailScreen({super.key, required this.post});

  final Post post;

  @override
  Widget build(BuildContext context) {
    final textTheme = Theme.of(context).textTheme;

    return Scaffold(
      appBar: AppBar(title: Text('Post #${post.id}')),
      body: SingleChildScrollView(
        padding: const EdgeInsets.all(20),
        child: Column(
          crossAxisAlignment: CrossAxisAlignment.start,
          children: [
            Text(post.title, style: textTheme.headlineSmall),
            const SizedBox(height: 8),
            Text('By user ${post.userId}', style: textTheme.labelLarge),
            const SizedBox(height: 20),
            Text(post.body, style: textTheme.bodyLarge),
          ],
        ),
      ),
    );
  }
}
We pass the Post object through the constructor, so the details screen does not need another network request.
Step 7: Update main.dart
Replace lib/main.dart with:
import 'package:flutter/material.dart';

import 'screens/posts_screen.dart';

void main() {
  runApp(const MyApp());
}

class MyApp extends StatelessWidget {
  const MyApp({super.key});

  @override
  Widget build(BuildContext context) {
    return MaterialApp(
      title: 'API Demo',
      debugShowCheckedModeBanner: false,
      theme: ThemeData(colorSchemeSeed: Colors.blue, useMaterial3: true),
      home: const PostsScreen(),
    );
  }
}
Your final folder structure:
lib/
├── main.dart
├── models/
│   └── post.dart
├── services/
│   └── post_service.dart
└── screens/
    ├── posts_screen.dart
    └── post_detail_screen.dart
Run the app:
flutter run
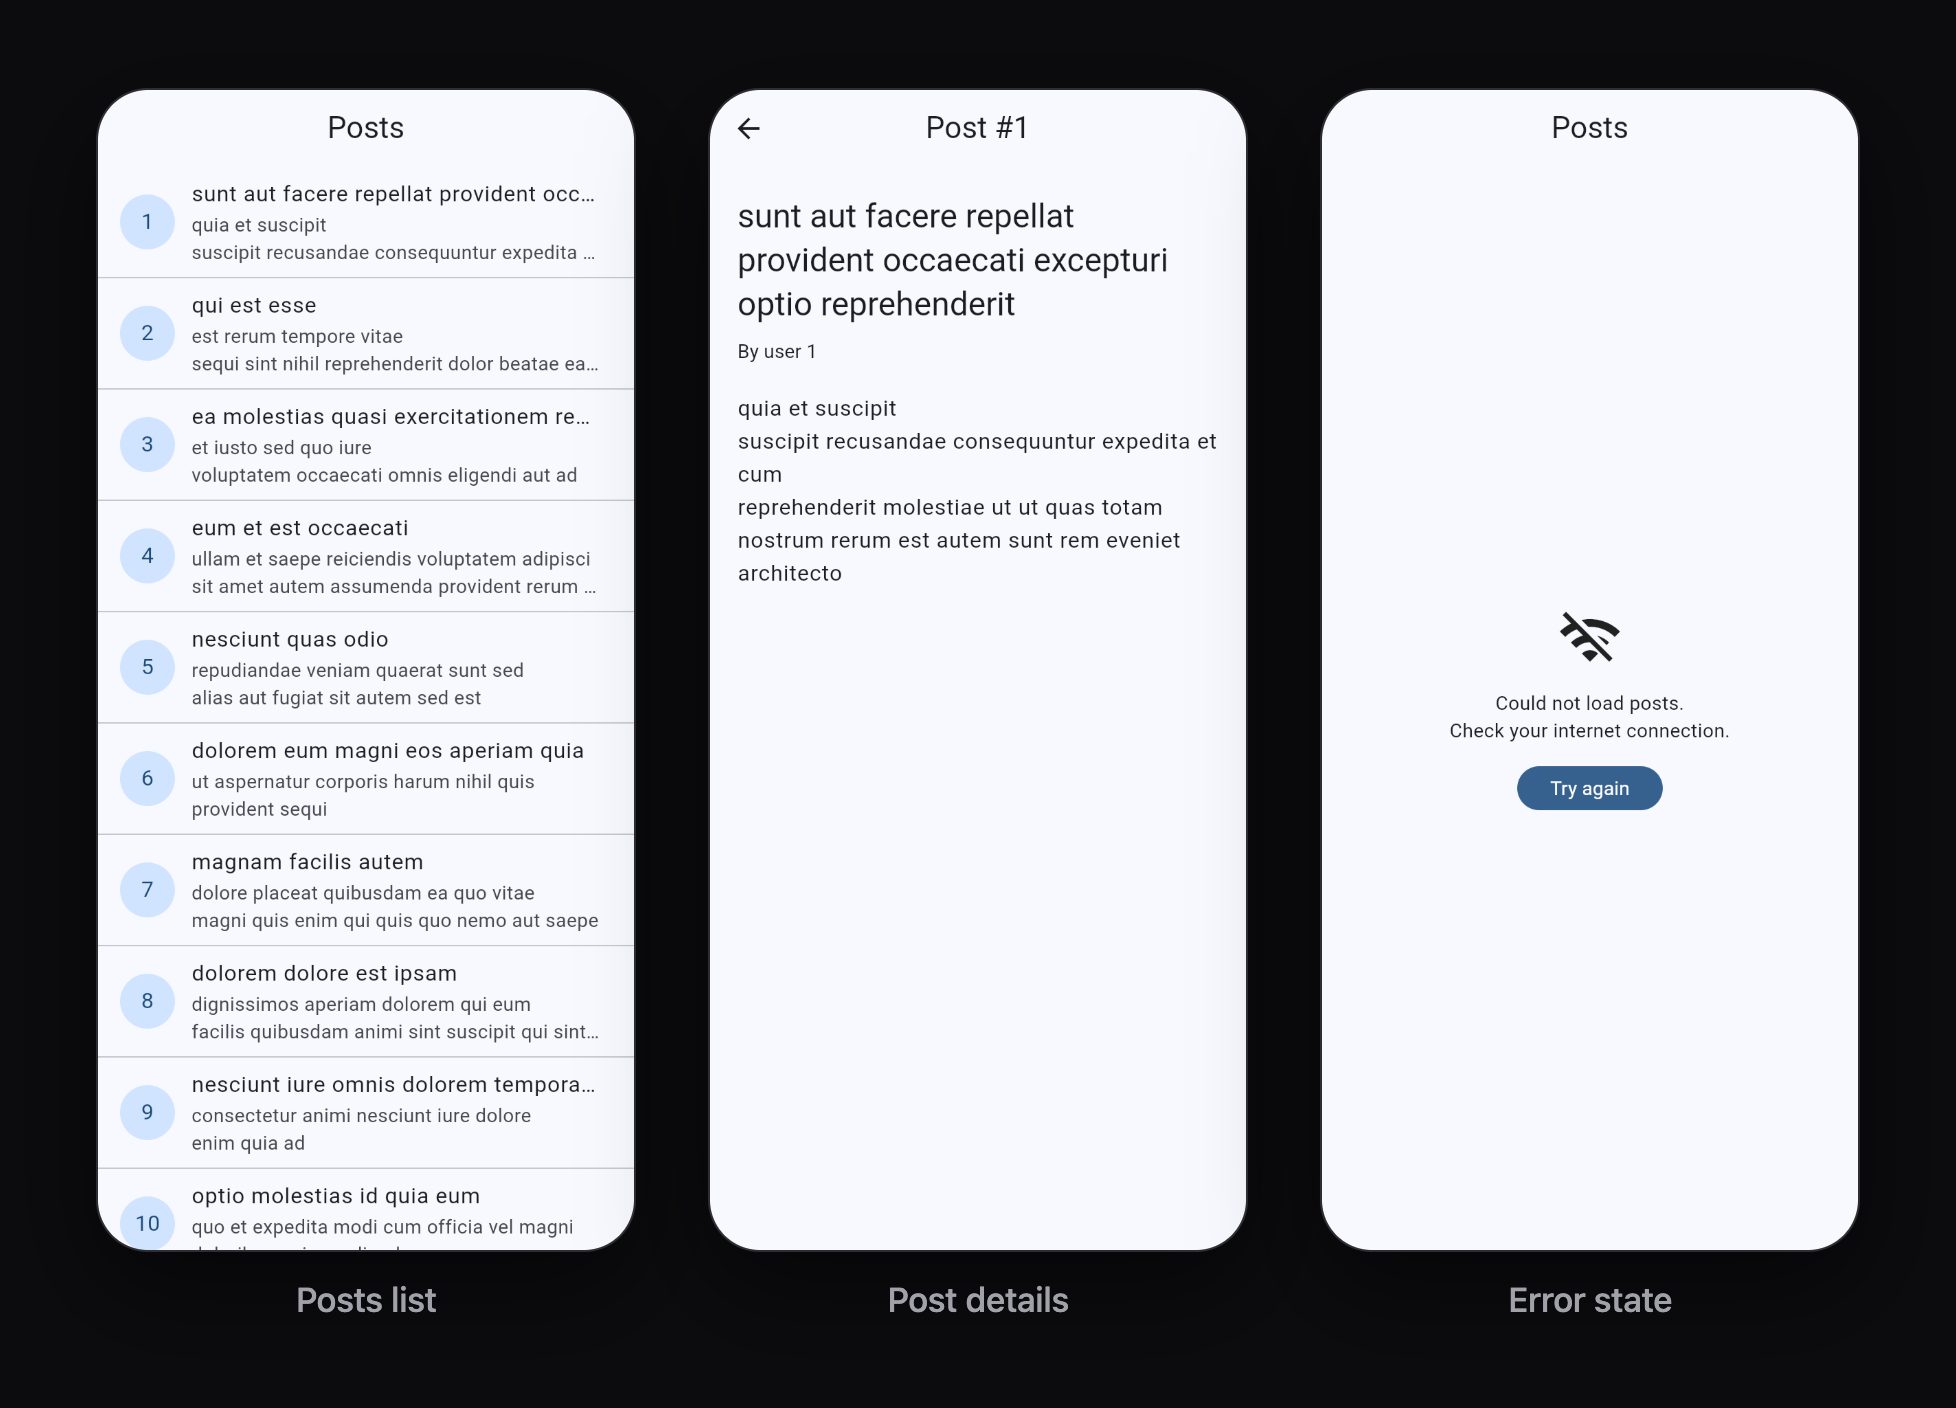
You will see a spinner for a moment, then a list of 100 posts. Tap a post to open it, and pull the list down to refresh. To test the error state, turn on airplane mode and tap Try again.
Sending data with a POST request
Fetching data uses GET. To send data (for example, creating a new post), use http.post with a JSON body:
Future<Post> createPost(String title, String body) async {
  final response = await http.post(
    Uri.parse('$_baseUrl/posts'),
    headers: {'Content-Type': 'application/json; charset=UTF-8'},
    body: jsonEncode({'title': title, 'body': body, 'userId': 1}),
  );

  if (response.statusCode != 201) {
    throw Exception('Failed to create post: ${response.statusCode}');
  }
  return Post.fromJson(jsonDecode(response.body) as Map<String, dynamic>);
}
jsonEncodeturns a Dart map into JSON text.- The
Content-Typeheader tells the server you are sending JSON. - A successful create usually returns status 201 (Created) instead of 200.
JSONPlaceholder is a fake API: it returns a success response but does not really save your post.
Common mistakes and how to fix them
The app works in debug but shows no data in the release APK
You forgot the INTERNET permission in android/app/src/main/AndroidManifest.xml. See Step 2.
"type 'List<dynamic>' is not a subtype of type 'Map<String, dynamic>'"
The API returned a list ([...]), but your code treats it as a single object ({...}), or the other way round. Open the URL in a browser: if it starts with [, decode it as a List; if it starts with {, decode it as a Map.
"type 'Null' is not a subtype of type 'String'"
A key is missing or spelled differently from the API (for example 'userid' instead of 'userId'). Check the exact key names. If a value can really be missing, make the field nullable: final String? subtitle; and read it with json['subtitle'] as String?.
The spinner shows again every time the screen rebuilds
You are creating the Future inside build. Move it to initState, as explained in Step 5.
"Connection refused" when calling a local server on the Android emulator
Inside the Android emulator, localhost means the emulator itself, not your computer. Use http://10.0.2.2:PORT to reach a server running on your computer. Also note that Android blocks plain http:// (non-HTTPS) requests by default in release builds.
"XMLHttpRequest error" on Flutter web
The API does not allow requests from browsers on other domains (this is called CORS). It is a server setting, not a Flutter bug. Test the same code on Android or iOS, or ask the API owner to enable CORS.
What to learn next
You can now load real data from the internet in Flutter. Good next steps:
- Real APIs: try a free API like a weather or movie API. The steps are the same: read the JSON, write a model, call
http.get. - Firebase instead of your own API: connect your Flutter app to Firebase and use Cloud Firestore for real-time data.
- Better project structure: as your app grows, move models and services into proper layers. See Flutter Clean Architecture and folder structure.
- State management: learn Provider, Riverpod or Bloc to share fetched data across many screens.
Keep reading
More articles
· 9 min read
Dart Basics for Flutter Beginners: Variables, Functions and Classes
Learn the Dart you need for Flutter: variables, final and const, null safety, lists and maps, if and loops, functions with named parameters, classes, and async/await, with runnable examples.
· 9 min read
Flutter Row, Column and Stack Explained with Examples
Understand Flutter's core layout widgets: main and cross axis, mainAxisAlignment, crossAxisAlignment, Expanded, Flexible, Spacer, Stack and Positioned, plus a complete profile card example.
· 7 min read
Flutter Navigation: How to Move Between Screens
Learn Flutter navigation step by step: Navigator.push and pop, passing data to a screen, returning results, pushReplacement for login flows, named routes, and when to use go_router.